Thursday, September 13, 2018

From Your Local Neighborhood Michael's

This week, I had time to peruse all store aisles while looking for polymer clay. I found this interesting section of plastic panels/sheets. There are all kinds, corrugated, flat, clear and translucent. One could fabricate many things with these sheets. Perhaps wall panels to fill in the openings, translucent sky light panels, frosted panel when the closet is missing, walls with door cut outs to separate bedrooms, kitchen from living area? endless possibilities here. 
For the clear clay, if you had the pasta clay roller machine, replacement windows could be made, fashioning the yellow trim from the auto tape I posted about earlier. 


 Here is yellow polymer clay, with the pasta roller machine, new doors could be made in any way you want them, solid, like the originals, or solid with the texture/pattern imprinted on them before baking in the oven. Maybe one day I will try this out. I am thinking it is way too time intensive to sell for profit, but a nice alternative to factory original, and if one is on a tight budget and cannot afford to have a compete house, just buy the old shell for $60-$100 and make all the missing pieces this way.


In the spirit of being crafty, I bought a couple of translucent blue storage bins at (you guessed it), to fabricate custom replacement doors for the 1978 blue Dream furniture China hutch. if yours are missing and you don't want to invest in originals, then this is a great in the meantime solution.


 I did not bother adding handles because I didn't think it was worth it.


 Speaking of being crafty, I am playing with the idea of closing in the house (temporarily) to see what it looks like solid, here I closed in the windows with yellow dollar store poster board.


Not too shabby... 

Monday, September 10, 2018

Take Inventory and Stage Your Home Using the Original Brochure

Fans have asked, and here it is, the original scanned brochure pictures of the 1977 Dream Furniture line.


To enlarge, click on the photos to expand them and see greater detail. For better inventory taking purposes, viewing the original instructions as best, I have a few and will scan when time permits, but they are on google or ebay as well. 

Different versions of the box show either the closet door mirrors facing out or in. That is a personal choice, I chose to have mine facing in, one it adds a nice little surprise when opening the doors, and two, thats how I did the mirror on the inside of my real closet door. Since the long pegs are supposed to be on top, if the stickers are already applied, the choice is made, but if you are adding new ones, then decide before applying. 

Presently, I have my A Frame staged with 3 extra floor pieces (the ones I got for $18 total on ebay awhile back), the yellow 'Vette, some dollar store cacti and two MGA Bratz World Mansion palm trees. I was collecting the World Mansions for awhile a few years ago. I also collect He Man (See MOTUC figures), the houses, when painted, made a great "Palace of Eternia" or "Crystal Palace" for She Ra. In 2015 you could get them for about $65-$125 dollars each, now they are not on ebay and are on amazon for $450. I would upgrade them by using lots of custom painting, window panels, floor panels, and contact papering the floors and ceiling. Overall, a great effect. Anyway, the palm trees are total Socal fab, so I use these for the A Frame now. Having the extra floor pieces works better than just having the triangle sections because then there is a full size patio or driveway outside to stage a complete area and it is not cramped up. I like having mine in the window so the light filters through it during the day.


On Getting A New Renovation Project

So, the house I posted about over a year ago that lived in storage and was actually never removed from the box in which it arrived is finally unpacked this week. While I got a great deal on it, and it is mostly complete, there were some disappointments. One, there were several broken wall pieces. I don't know if this happened during shipment or was like that but my answer to that was to super glue the broken pieces, very cheap to correct, quickly and easily done. Sadly, the post covers were Seran wrapped in with the large heavy pieces, they were especially brittle (think Pringles potato chips, and just as yellow). When I removed the large pieces, I was left with a huge pile of styrofoam packing popcorn and dozens of sharp shards of post covers. That's one of my pet peeves about sellers. One thing about my selling, a buyer never has to vacuum the floor after unpacking a house shipped by me. Some I can restore, but some are smashed to smithereens but I will save them, maybe they will fit a future reno. I recently heard the new replacement post covers are no longer available, but you can still purchase vintage ones in good or restorable condition, as well as make new ones from poster boards as outlined in earlier posts.


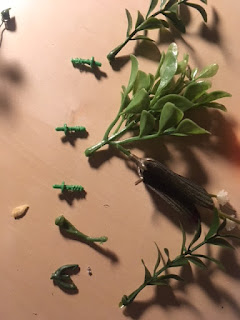
There were zero original flowers included, so here is a laying out of flowers and plants I will use to restore the planters. It's a mix of cheaper and better foliage, I was short on flowers, so I am using these baby's breath from the dollar store, the better ones tend to be from aquarium plants or small plants from Jo Ann Fabric, usually the dollar store or walmart. I am still looking for a good way to pull out the original pegs without completely stripping and damaging them with the needle nose pliers I use to yank them out like bad teeth. Generally, a hot glue gun, or Elmer's glue is best for securing new plants whether or not you use silk flower wire with foam to anchor in place.

As you know, many of the original door hinge pegs are snapped off. In this resto project house, one of the doors has what appears to be a screw with the  head removed put in place of th old peg. To do this, you will have to drill a tiny pilot hole, carefully screw in a tiny screw and then carefully cut off the head, maybe with a Dremel cutter tool or wire cutter? I am not sure. This is a fine solution, though the length of the screw is key (no pun), because these screws are slightly too long to safely remove the door without chance of cracking it when bending it to allow removal.

The house did come with two closet doors (no closet), so this allowed the opportunity to upgrade the doors I had. The doors I had included original mirror decals (though worn) and melt marks on the other side of one. The newly arrived doors were in good shape, all pegs, no marks, but no mirrors. So, I decided to try out this new (more shiny than the other roll I have) car mirror vinyl I bought as replacement mirror decal. I posted earlier about this procedure, so this is my second time performing it. It went a little better this time. Here are the basic tools you will need:

 The old mirror decaled doors are on the left, the new ones on the right.
 I polished the doors on the right with PlastX car restorer. It looks like yellow glass. Incidentally, when I unpacked my own A Frame house, since I polished it last year before storing it, I forgot just how shiny all the smooth surfaces are, I am very pleased with the results. It buffs out and polishes all scuffs and marks, and looks better than new!
To properly apply the new mirrors, I place and smooth out a rough cut of the mirror sticker. Then, I take a soft edged tool, like a dental gum massager and tuck the edges into the two bevels of the door panel, then I take a harder but very pointy tool, in this case a dental pick. This outlines the very precise edges in which to cut with an exacto knife. You can use a ruler to guide the knife if you need to, though all my years of building model kits left me with quite steady hands, so I did not. In just a few places did the knife go a wee bit off course, but I quickly corrected and it's barely noticeable. Peel off the excess, and finally hit it with a hot air hair dryer, or hold over a votive candle, take your hand covered in a sock or cloth glove and press in the warmed up decal into the edges. This seals it in place and eliminates any tiny flaws. I cut mine so there is a beveled edge to look like a beveled mirror, but that is up to you. I think it adds a nice finishing touch to it. I am happy with my newly mirrored doors. Even if I do not make any money on my reno project, I am content in being able to upgrade a few pieces on my personal one. I also swapped out a painted light sconce on my house for a non painted one, though I will need to soak it in some soft scrub with bleach cream to lighten in up some. Now my house is completely paint free!

I tried to upgrade other pieces like the roof panels, I have a nice dark red roof set, but it is dated 1979 and I would prefer 1978, also there is a small hole drilled because the person building it thought Mattel  forgot to add it when it is supposed to be screwed from the under side, as we all know. To this day, 8-10 houses later, I still cannot find non flawed roof panels as dark as mine, nor whiter flower boxes that don't have a screw hole drilled in them like my roof panels, so they remain on my house.

FYI, Removing windows is always a dicey task. The best method I can figure out is to slowly and gently separate one hinge of the window from the peg of the window frame, the key here is to pull OUTWARD because there is a teeny tiny notch on the inside that looks like it is there to make install and de install easier. Pull STRAIGHT out, not at an angle as that is the direction of the notch. With longer windows, you can slightly bend the window, just not in the "case" of the small ones. Even so, I have broken the plastic around the tiny notches in at least one window since I always completely disassemble each house when renovating. Theoretically, you could hit it with a hair dryer to warm the parts up so they are more pliable, but I think the aforementioned technique will work. To repair broken hinges/notches, I am thinking of trying a drop of melted candle wax on the peg and the hinge and seeing if that tightens up the moving parts. Ideally, you want the ability to leave the windows partially open, that's how I display my house.

Doin' a load of whites, I have found the best tarp on which to spray paint the white parts is plain packing paper, for less than $20 for a 10 pound box, I wouldn't use newspaper for fear of the ink coming off on the pieces, especially if they are tacky from the paint. It is a lot to paint, so plan on buying 2-3 cans and definitely do it outside. 


As of now, this is your best bet for finding a "decent" deal on an A Frame house in the wild: Facebook Marketplace sellers:


It will be dirty and incomplete, but as you know the restoration process is a labor of love. This one had the patio triangles and was on sale for $106 that week, Only 2 hours of driving round trip but that is quicker than waiting a week for UPS. =-0 


fix renovate replace make door window hinge repair fix 

Thursday, September 6, 2018

Some More Finer Points on Assembly: Screw Sizes, Replacing Flowers & Plants, Fitting it Together

 So after moving and unpacking everything, toys included, I bought a special table just for my best number one A-frame house, put it together put it up in the window and then I unpacked my beloved a frame, it’s been in storage for over two years so I have not built one in over two years, so for the first time in a long time there was a few moments of, OK what goes next?, like which post covers go  where, naturally I was too lazy to go look up the instructions, fortunately there was no damage occurred in storage, and incidentally after two years in an unair-conditioned Storage unit where temperatures got to be 125° or hotter, there was no noticeable browning or fading of anything, but then It as only two years and there was no direct sunlight and it was insulated by lots and lots of packing material and other boxes. So, suffice it to say, here are some photos with some late breaking tips from the master himself, enjoy and I hope you incorporate these into your house or houses.


 Here's another look at my finished custom planter box, it's worth the extra effort (plant hunt, flower arrangement/installation).
This is the behind the scenes look at the method I personally use to secure the plants in place, I am sure there is a better way, but dollar store silk floral foam is my current method.

 When assembling the balcony and glass doors, ensure that the T-post base tab is on the top of the balcony floor. Otherwise, the doors will not go in (never force them in, it's not worth the risk of fracturing or snapping off the pegs).
 There should be a top gap between the glass door and the upper opening, this wiggle room allows installer to finagle the peg into place, if you do not see this gap, check the T-post tab and make sure it is not underneath the balcony floor.

 When assembling, to make sure the upper floor pieces do not get stuck on the posts, I take a rag and little spray can of oil, like Wd40, while holding the rag behind the post, LIGHTLY spray each side. After sliding the floor pieces down in place, never bang them all the way in, you run the risk of chipping the top part of the post covers, see here in this photo, you want push into place while at the same time wiggling into place gently, then turn the house section on its side and inspect to ensure that the post covers are securely tucked into the floor opening. I rarely use the bottom of the house screws since everything is a tight fit, one could use the roof screws as the roof pieces do separate rather easily without the screws. See previous posts regarding restoring and replacing screws.

  For my A Frame, I use the new replacement post covers (see earlier post on how to purchase them). Since these are identical to the originals, there is still one inner edge wider than the other side, since I like continuity and reasoning behind install methods, I always put the wider of the tabs on the outside side of the post, I think it 'puffs' it out a few more millimeters for a thicker post. Also, just because I have OCD (unofficially), I read the writing underneath all the floor pieces and have the side that reads, 'FRONT' on the front side, technically they are reversible and no one would know, but I would, so I do it. Speaking of reversible sides, I always wanted the circle patterned doors and wall panels to have the nicer, more 3D side facing out, but then you would miss out on the wall panels and door handles since they did not put them on the same side, so I display the way it was intended so it all matches and I get to see the paneling.


You'll also notice it gets stuck about ⅔ the way down. don't jam it down and force it. Simply pinch the sides and the center edge will bow out allowing you to easily finish sliding it down.


These are all dollar store items, so no big investment here. I used to use the rubber mallet to tap things into place, but if you oil it like described, then it will not be necessary.


The main thing to remember to do the best job assembling is not to rush it; put on some music, lay out the instructions, lay out all the parts, take your time and enjoy it.


Sorry I dont have the exact bolt or screw sizes but this should help you some. If you have at least one original bolt take it to the hardware store and there is a size identifier card on the shelf next to the bolts for this exact purpose. Remember not to force a too big bolt or it will definitely crack the surround, get the right size and then put a tiny half spray of wd 40 on it to ensure forever easy glide and non rusting screws. Good luck with it. =-) 

Saturday, July 28, 2018

And Now, For the News...

I wouldn't normally post about something not directly related to the 1978 house, however, this was really good so I wanted all of the site followers to know about it. This new documentary is on Hulu (hopefully you are watching The Handmaid's Tale!) and is called, "Tiny Shoulders: Rethinking Barbie".


It is definitely a thought provoking watch, and we certainly all have our opinions about Barbie, what she stands for and what she means to children and the world. I think the dialogue is important because we still live in a world where women's rights, values and respect in the work place (especially in politics) are questioned. It seems to me that Barbie's image/purpose/message has traditionally been a two fold dichotomy. For one, (recounting the early years especially) she is the ultimate physical* ideal (tall, thin, young and blonde), on the other hand, she is also dons many career hats. Since in reality, people do not usually excel in physicality AND intellect, this presents an interesting cross roads for the perception of Barbie and consequently, dreams of being a grown up. 

Do I endeavor to be absolutely physically gorgeous/fashionable (at the risk of being shallow), or do I become a doctor, pilot or mathematician? Is there the pressure to be both gorgeous and successful? Is being tall, thin and blonde the only route to physical adoration? So many issues coming all at once! So, the documentary focuses on the new line of bodies that came out in recent years under the name, Project Dawn. I guess that means, dawn of a new era. I think that Mattel had an interesting challenge. In the world of the 50's it was socially acceptable to be a content house wife who was just beautiful and nice and thats about it (think Betty on Mad Men). 

Since probably the mid 60's that view dramatically shifted and especially now with shifting demographics, there are many, many many different versions of beautiful (color, height, width, etc). Mattel could either stay the course and keep her unrealistically thin and blond, or really, really change with the times (not just playing dress up with "teacher barbie" or "army barbie" and completely reinvent herself inside and out. Some would say (they did), "the PC police got her hands on barbie", or "why not have a healthy barbie who exercises rather than make a fat barbie", or "what child wants to be given fat barbie for a gift?", or even "fat barbie needs dad bod ken", "Let's call her Barbie's chubbie cousin, Carbie". 

All are valid questions, however, ultimately I am in the 'change with the times' camp, children are supposed to relate to their doll and dream through the doll about growing up. So few of us can relate to being tall, thin, blond and gorgeous. I do wonder once all the clothes have been played with and mixed up, how on earth will people know what size fits what in the future (when purchasing after market). A major feature of the toy line was always that the clothes are universal, as are the cars and accessories, so changing the size of the body can introduce some new challenges. Regardless, the world evolves and so did our glamour girl. Hope you enjoy the film. 

Monday, July 23, 2018

What are These?

Just came across it tonight, I guess it's a Moschino window store dressing. Nice reimagineering of the house. They thought of the furniture, too, and is a yellow/pink hybrid.


I am guessing this is a dog house? Either way, it's so weird I love it!
I'm not personally a member, but was noticing how similar the current Mattel reference to the Dreamhouse is to the 1978-1979 Barbie A Frame Super Star Era Dream House doll house is:

Friday, July 20, 2018

Revisiting the 1980 Commercial

I am not sure why it took 2 years for the commercial to come out (if the date on the video is accurate), but there it is, nearly identical to the 1982 commercial, just sans the grandparents. I have not yet found one that goes to the pink house.

https://www.youtube.com/watch?v=imW-7f1GZmA

 I don't remember if I got mine for Christmas or not, I was about 5 years old.

Showing the furnished rooms of the house. 

Gramma putting the bow and tag on before Tracy comes down. 

Gramma and Mom wishing they had this when she was a little girl. 

Here's the money shot, the home in all of it's glory. 

The windows are pretty neat! One of mine is loose, so I am planning to drip hot wax on the hinge and see how that tightens it. 

Notice how they always elevate the house to make it seem bigger? They could have just hired little people, too!