
So, the house I posted about over a year ago that lived in storage and was actually never removed from the box in which it arrived is finally unpacked this week. While I got a great deal on it, and it is mostly complete, there were some disappointments. One, there were several broken wall pieces. I don't know if this happened during shipment or was like that but my answer to that was to super glue the broken pieces, very cheap to correct, quickly and easily done. Sadly, the post covers were Seran wrapped in with the large heavy pieces, they were especially brittle (think Pringles potato chips, and just as yellow). When I removed the large pieces, I was left with a huge pile of styrofoam packing popcorn and dozens of sharp shards of post covers. That's one of my pet peeves about sellers. One thing about my selling, a buyer never has to vacuum the floor after unpacking a house shipped by me. Some I can restore, but some are smashed to smithereens but I will save them, maybe they will fit a future reno. I recently heard the new replacement post covers are no longer available, but you can still purchase vintage ones in good or restorable condition, as well as make new ones from poster boards as outlined in earlier posts.


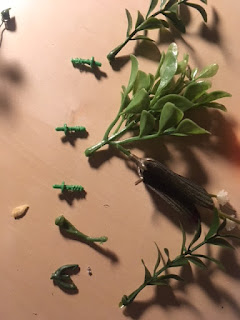
There were zero original flowers included, so here is a laying out of flowers and plants I will use to restore the planters. It's a mix of cheaper and better foliage, I was short on flowers, so I am using these baby's breath from the dollar store, the better ones tend to be from aquarium plants or small plants from Jo Ann Fabric, usually the dollar store or walmart. I am still looking for a good way to pull out the original pegs without completely stripping and damaging them with the needle nose pliers I use to yank them out like bad teeth. Generally, a hot glue gun, or Elmer's glue is best for securing new plants whether or not you use silk flower wire with foam to anchor in place.
 As you know, many of the original door hinge pegs are snapped off. In this resto project house, one of the doors has what appears to be a screw with the head removed put in place of th old peg. To do this, you will have to drill a tiny pilot hole, carefully screw in a tiny screw and then carefully cut off the head, maybe with a Dremel cutter tool or wire cutter? I am not sure. This is a fine solution, though the length of the screw is key (no pun), because these screws are slightly too long to safely remove the door without chance of cracking it when bending it to allow removal.
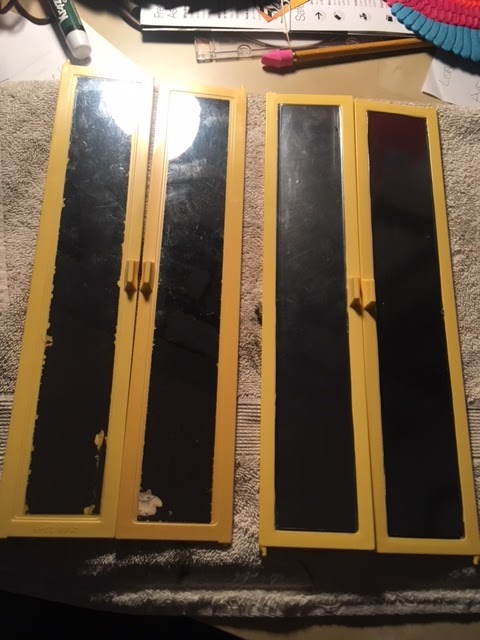
 The old mirror decaled doors are on the left, the new ones on the right.
 I polished the doors on the right with PlastX car restorer. It looks like yellow glass. Incidentally, when I unpacked my own A Frame house, since I polished it last year before storing it, I forgot just how shiny all the smooth surfaces are, I am very pleased with the results. It buffs out and polishes all scuffs and marks, and looks better than new!
 To properly apply the new mirrors, I place and smooth out a rough cut of the mirror sticker. Then, I take a soft edged tool, like a dental gum massager and tuck the edges into the two bevels of the door panel, then I take a harder but very pointy tool, in this case a dental pick. This outlines the very precise edges in which to cut with an exacto knife. You can use a ruler to guide the knife if you need to, though all my years of building model kits left me with quite steady hands, so I did not. In just a few places did the knife go a wee bit off course, but I quickly corrected and it's barely noticeable. Peel off the excess, and finally hit it with a hot air hair dryer, or hold over a votive candle, take your hand covered in a sock or cloth glove and press in the warmed up decal into the edges. This seals it in place and eliminates any tiny flaws. I cut mine so there is a beveled edge to look like a beveled mirror, but that is up to you. I think it adds a nice finishing touch to it. I am happy with my newly mirrored doors. Even if I do not make any money on my reno project, I am content in being able to upgrade a few pieces on my personal one. I also swapped out a painted light sconce on my house for a non painted one, though I will need to soak it in some soft scrub with bleach cream to lighten in up some. Now my house is completely paint free!
I tried to upgrade other pieces like the roof panels, I have a nice dark red roof set, but it is dated 1979 and I would prefer 1978, also there is a small hole drilled because the person building it thought Mattel forgot to add it when it is supposed to be screwed from the under side, as we all know. To this day, 8-10 houses later, I still cannot find non flawed roof panels as dark as mine, nor whiter flower boxes that don't have a screw hole drilled in them like my roof panels, so they remain on my house.
FYI, Removing windows is always a dicey task. The best method I can figure out is to slowly and gently separate one hinge of the window from the peg of the window frame, the key here is to pull OUTWARD because there is a teeny tiny notch on the inside that looks like it is there to make install and de install easier. Pull STRAIGHT out, not at an angle as that is the direction of the notch. With longer windows, you can slightly bend the window, just not in the "case" of the small ones. Even so, I have broken the plastic around the tiny notches in at least one window since I always completely disassemble each house when renovating. Theoretically, you could hit it with a hair dryer to warm the parts up so they are more pliable, but I think the aforementioned technique will work. To repair broken hinges/notches, I am thinking of trying a drop of melted candle wax on the peg and the hinge and seeing if that tightens up the moving parts. Ideally, you want the ability to leave the windows partially open, that's how I display my house.
 Doin' a load of whites, I have found the best tarp on which to spray paint the white parts is plain packing paper, for less than $20 for a 10 pound box, I wouldn't use newspaper for fear of the ink coming off on the pieces, especially if they are tacky from the paint. It is a lot to paint, so plan on buying 2-3 cans and definitely do it outside.


The house did come with two closet doors (no closet), so this allowed the opportunity to upgrade the doors I had. The doors I had included original mirror decals (though worn) and melt marks on the other side of one. The newly arrived doors were in good shape, all pegs, no marks, but no mirrors. So, I decided to try out this new (more shiny than the other roll I have) car mirror vinyl I bought as replacement mirror decal. I posted earlier about this procedure, so this is my second time performing it. It went a little better this time. Here are the basic tools you will need:


I tried to upgrade other pieces like the roof panels, I have a nice dark red roof set, but it is dated 1979 and I would prefer 1978, also there is a small hole drilled because the person building it thought Mattel forgot to add it when it is supposed to be screwed from the under side, as we all know. To this day, 8-10 houses later, I still cannot find non flawed roof panels as dark as mine, nor whiter flower boxes that don't have a screw hole drilled in them like my roof panels, so they remain on my house.
FYI, Removing windows is always a dicey task. The best method I can figure out is to slowly and gently separate one hinge of the window from the peg of the window frame, the key here is to pull OUTWARD because there is a teeny tiny notch on the inside that looks like it is there to make install and de install easier. Pull STRAIGHT out, not at an angle as that is the direction of the notch. With longer windows, you can slightly bend the window, just not in the "case" of the small ones. Even so, I have broken the plastic around the tiny notches in at least one window since I always completely disassemble each house when renovating. Theoretically, you could hit it with a hair dryer to warm the parts up so they are more pliable, but I think the aforementioned technique will work. To repair broken hinges/notches, I am thinking of trying a drop of melted candle wax on the peg and the hinge and seeing if that tightens up the moving parts. Ideally, you want the ability to leave the windows partially open, that's how I display my house.

As of now, this is your best bet for finding a "decent" deal on an A Frame house in the wild: Facebook Marketplace sellers:
.png)
It will be dirty and incomplete, but as you know the restoration process is a labor of love. This one had the patio triangles and was on sale for $106 that week, Only 2 hours of driving round trip but that is quicker than waiting a week for UPS. =-0
fix renovate replace make door window hinge repair fix
No comments:
Post a Comment