


So many have asked for it, so here are the instructions. Feel free to right click and save and or print, they are my gift to you. Its the same instructions folks are selling on ebay. the orange and white image is the old correspondence card you could send in if you needed help with anything. I guess it was cheaper than call centers or maybe they didnt have 800 numbers in the 70's? I remember my 1987 Ghostbusters firehouse didnt have the instruction so we just called them up and they sent out replacements for free. =-) Those were the days!
1979 Front Page from pintrest post:


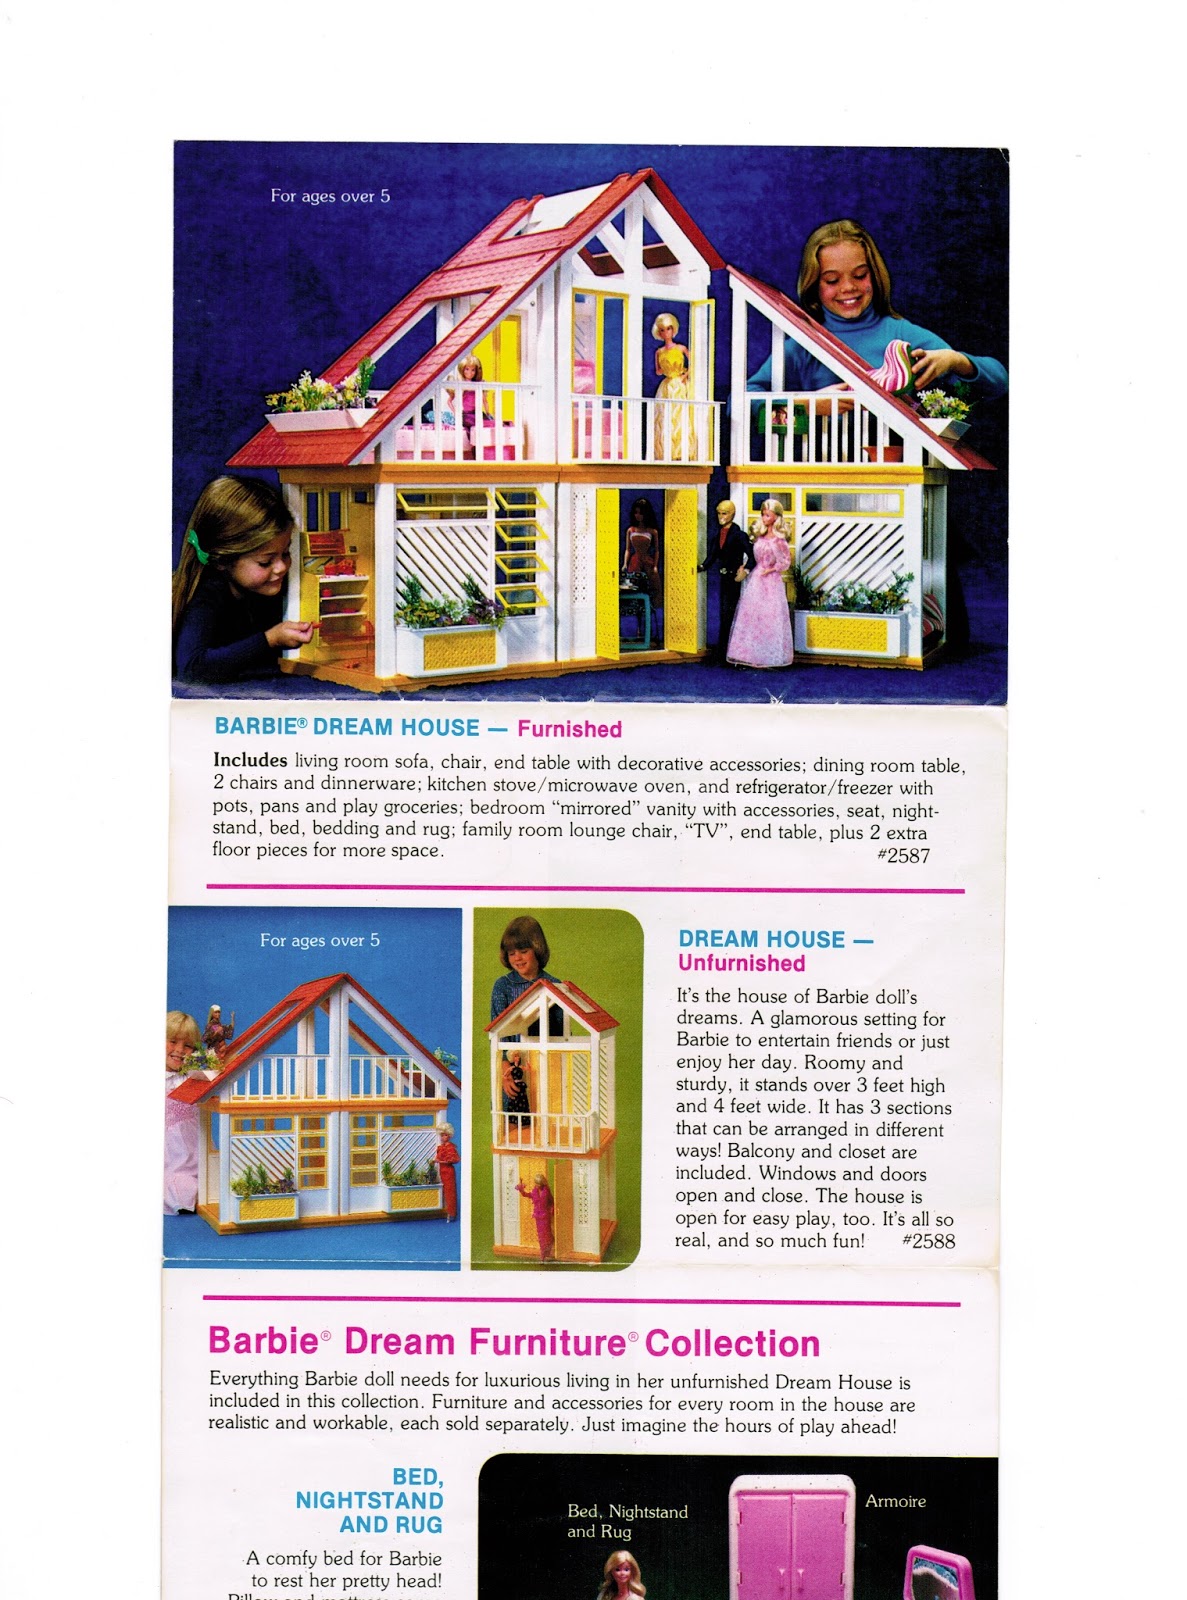
SO, all I can think of when I see these rare pieces are, 'Does the person who pays $500 for an unassembled house peel the stickers and pick the small pieces off the trees?' I hope not!!
I cannot thank you enough for making this available, and for free at that. The last time I saw a dream house was when, at 13 or so, I sold the one my sister passed down to me along with the rest of my Barbie collection that had accumulated because there was something that became more important to me at the time and I wanted the money more than the dolls. I sold everything I had (and it was a LOT - enough to fill several 6' or 8'tables) for $250. Then I cried and cried, and cried. Only when I was by myself, but you can be assured that this went on for weeks.
ReplyDeleteI am now a mother myself, and have four children, two of which are girls (almost 12 and just turned 5). I was at a yard sale a few weeks ago when I spotted the telltale yellow patio triangles and red roofs of my childhood, except that someone had for some reason dismantled the entire thing. Amazingly, I was the only person there who recognized this treasure for what it was and was giddy inside, but remained calm as I asked how much the woman was asking for it. She asked me what I would be doing with it and I told her it would either be a birthday or Christmas gift for my (at the time) 4 year old. She sold me the house, every piece of furniture, every detail item down to post and pans, forks and knives, etc, and a giant bin of mixed modern and vintage Barbies/Kens/Skippers, etc AND clothes for $30!!! I couldn't believe it.
There are only a few things wrong with ours and I am not really sure how to fix them. At this point, I used a piece of card stock and scotch tape in place of the broken 3" corner, and chose a cosmetic instead of structural area for the missing 15" corner cover. Two of the 3" corner covers are broken in half lengthwise and one half of one is missing completely. One 15" corner cover is missing completely. One of the little Windows that is stacked 4 high is missing. There are probably 5 places where the pegs are broken off, so the windows/doors won't stay on. The refrigerator is one of them. However, everything else is good as far as I know and things are there down to the flowers in the boxes.
Thank you SO much for making these instructions available. I am not sure I could have done this without them, definitely not as quickly as I did. I had no idea until I came to your blog yesterday and started looking around that this is even an item anybody else is looking for. It is good to know that as long as the kids take care of it, we will be able to sell it if we ever decide to do that.
Thanks again for all of your hard work that has gone into creating and maintaining this site. It is very helpful in situations like mine.
Thank you for your post, I am glad I could help. My goal is to provide a one stop resource for collectors to properly renovate these. If you go to the search box on this blog and enter terms like 'post covers', 'wax', 'flowers', etc, you will find blog entries devoted to restoring the house to like new condition (or as good as it can possibly get). The fridge hinge has a post, but in short you can use a Q tip to replace the always broken hinge. I am going this morning to the dollar tree to get white poster board to replace the missing post covers on my current reno. Keep posting, I think everything you need is already blogged about, so have a look around and enjoy. =-)
DeleteHi, thank you so much for taking the time to create this site. I am 46 and have a daughter who is 5. I have been holding on to my Barbie Dream House all these years to give it to my future daughter. The time has come and of course I don't have the original box or instructions. I printed your instructions and found I am missing some items. I have moved many times unfortunately. Besides eBay, do you know of any way I could find the walls and 2 side roofs? The other pieces I am missing I did find on eBay. I had wanted to give it to my daughter this Christmas, but it seems that I will have to hold off. Any help will be appreciated. Thank you!
ReplyDeleteHi, sorry to be getting to you so late! As you may have discovered already, usually the best way is to slowly watch ebay over time for those missing parts, or to just buy a second house and raid it for pieces, selling off the rest. You could try Craigslist. Its a long shot, but I have found plenty of houses, some even for a good deal if they are really in bad shape, you could at least get the walls and roof pieces. I would just recommend not to do anything via the mail since there is no buyer protection, I would drive to them and pick it up in person. Anyhow, good luck and glad this blog is helpful for you!
DeleteThanks for taking the time to put up the instructions. This was the house of my dreams as a kid; unfortunately, mom couldn't afford it. My husband gave me one for my birthday, and now I'm in the middle of restoring it, thanks to your advice & suggestions. It's so hard to find info on this beautiful house, so I was happy when I found your site. You have a lot of great & interesting info. Yesterday I bought another one for $15. It's dirty and missing a few things, but no cracks or breaks. So it's time to start the process all over. Thanks again!
ReplyDeleteYou are most welcome, where did you find one for $15?
DeleteThis comment has been removed by the author.
ReplyDeleteWow! I am so excited to find this! My parents have begun moving around my Barbie Dreamhouse for the last 40 years or so.
ReplyDeleteI am missing all the screws. I don't see a list of the sizes of the needed screws. Anyone know what size the short and long screws are and how many of each??
My almost 5 year old twin girls are so excited to play with my Dreamhouse!
I need this answer myself. I am putting mine together to sell now that my son has only given me grandsons. :) I know you need 22 long and 6 short screws. I checked online and someone on Ebay claims to be selling the original screws, however they only show one size. Not sure if that is a legit post or not. I will keep looking and hopefully we will find out the exact size. I am so surprised the manual wasn't more specific.
DeleteSorry, I should have included that info. the Long screws are 1 ⅛" long, the short ones are 9/16" long, I cant remember when I bought some new ones years ago, but they could possibly be ⅜" thickness, you will likely have to buy phillips star head screws as flat head screws are rarely used anymore.
DeleteThis comment has been removed by the author.
ReplyDeleteAM
ReplyDeleteThank you, THANK YOU for this!! My friend still had this from her childhood (disassembled) & asked if we wanted it for our girls. This post saved the day!! I was at loss until I found your site. Thanks so much for sharing :)
What size screws would they be?
ReplyDeleteGo to the search box in this site and enter SCREWS and the post will populate.
DeleteThank you for posting this. My doll house has sat dismantled in boxes for years and I wanted to put it together for my son. I got it second hand in 1986 and had no instructions. Couldn’t have done it without you!
ReplyDeleteThank you so much! You are a life saver with these instructions. I had no idea how to put together the Dream Cottage I bought. Thank goodness I found this page! Bless you! There’s no way I would have been able to put it together without your instructions.
ReplyDeleteYou are most welcome!
DeleteYes! Everything everyone said above! Thank you for the instructions and the amount of screws and sizes. I would’ve figured it out eventually, however, I’m certain I would have been giving it to my grandchildren rather than my daughter (she’s 4) had I never found this blog! Lmao.
ReplyDeleteSo glad to find assembly instructions...Santa didn't save them back in 1978! Mine was packed away in 1993, dissembled..seem to have all pieces.the plastic corner covers are discolored and very fragile..any recs??
ReplyDeleteI have several posts on this site dedicated to restoring and replacing posts, just enter POSTS in the search box and they will populate.
DeleteHi! Im glad i stumbled upon this website! I just want to ask on the dimensions of the house like the length, width and height of each section of the house. I was planning to recreate this kind of dreamhouse coz I'm really fascinated by it. Well, I'm so in love on the a frame dreamhouse that my aunt used to have as a kid but when she grew older, all of her barbies and dreamhouse are missing or somehow lost during moving to a new place. Buying it on ebay is pricey coz I'm not living in the US. I hope you can read this. Thank you
ReplyDeleteOh I forgot to mention, I always look back on their photo albums of their barbie collection that's why I'm planning to recreate it.
DeleteI don't know the dimensions off the top of my head and mine is currently packed up, I just remember it's about 3 feet high by 4 feet long.
DeleteI just got my very first Dream House today and I'm so excited to fix it and furnish it!
ReplyDeleteGreetings, I just wanted to take a moment and thank you for this thread. My sister gave me her childhood dreamhouse for my daughter and I would have had a lot of trouble assembling it without these instructions. Now the 1978 Dream House is re assembled to bring happiness to another generation. Thank you!
ReplyDeleteThank you so much for posting these instructions! When I was living in a smaller apartment, I took my Barbie dream house apart to save on room but now that I have moved to a bigger place I decided to put it back together. I did that today and I don’t think I could have done it without the help of your blog! I am missing pieces and I might go on eBay to see if I can find them. Thank you again!!
ReplyDeleteThank you so much for posting these instructions! When I was living in a smaller apartment, I took my Barbie dream house apart to save on room but now that I have moved to a bigger place I decided to put it back together. I did that today and I don’t think I could have done it without the help of your blog! I am missing pieces and I might go on eBay to see if I can find them. Thank you again!!
ReplyDeleteHappy to help, when I sold these restored I would always include a photocopied version for the new home owner.
ReplyDeleteJust found this house at Goodwill, partly taken apart. This will be a great help in rebuilding it.
ReplyDeleteClearly I am clueless. I can email you a picture but one of the white posts on mine is cracked. It’s at my dad’s so I’ll have to get over there to take the pic. Anyhow, I can’t see where it talks about repairs. I see the directions and pieces. Mine has been put together since I got it in the 70s. I’d love to sell it but have no clue what I could get with that one issue. And for kicks I thought I’d share that I pulled out the salon and a few other places Barbie went to as well as clothes and Barbie’s in boxes.
ReplyDeleteHi, if it is the structural wall post, I would ensure it's clean, then super glue it. If it is the slip cover, clean it, then use good tape, carefully applied, or leave it up to the new owners after discoloring all home flaws. These sell on ebay but are a huge pain to list as it involves: photography, description, answering questions, disassembly, packing it up, paying the 15% ebay fees plus large box/weight shipping, insuring it, getting it to the carrier, and dealing with any buyer issues after sale like damage during transit or any "item not as described" claims, or simply sell it on facebook, though it may take longer and go for less (maybe). Find the search term box here and enter "post repair" and someplace the blog entry should populate, or just keep scrolling, I do cover repairs extensively on the blog. Good luck!
Delete